Getting Started with The Neighborhood on BlockPI Dedicated Nodes

BlockPI
Apr 20, 20265min read
Getting Started with The Neighborhood on BlockPI Dedicated Nodes
As blockchain applications evolve, the way developers consume on-chain data is also changing.
For many teams, raw blockchain data alone is no longer enough. They need a more flexible way to access, filter, transform, and route data without rebuilding the same infrastructure stack from scratch.
That is why The Neighborhood, now available through BlockPI Dedicated Nodes, matters.
https://blockpi.io/advanced/onchain_data_pipelines
With this integration, developers can start from dedicated infrastructure, enable The Neighborhood as an advanced feature during purchase, and then use their BlockPI endpoint to call The Neighborhood methods directly. This creates a cleaner workflow for teams that want more than just raw node access.
In this article, we will walk through the basic usage flow and show example request patterns for getting started.
Step 1: Purchase a Dedicated Node in the BlockPI Dashboard
The first step is to create a dedicated node from the BlockPI dashboard.
Inside the Dedicated Node section, users can configure:
- target network,
- environment,
- deployment region,
- node configuration,
- subscription period,
- and advanced features.
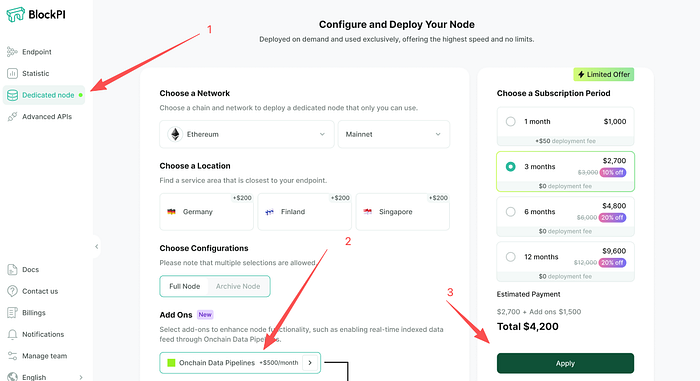
For users who want to use The Neighborhood, the key step is to select The Neighborhood during the dedicated node purchase flow.
Once enabled, The Neighborhood becomes part of the dedicated node environment, allowing developers to use the purchased BlockPI endpoint as the access point for Neighborhood-powered requests.
This setup provides a cleaner operational model:
- infrastructure is provisioned through BlockPI,
- advanced capability is enabled during purchase,
- and usage begins through the same endpoint layer developers already work with.
Step 2: Get Your BlockPI Endpoint And API Key
After the dedicated node is successfully deployed, BlockPI provides the endpoint for that node.
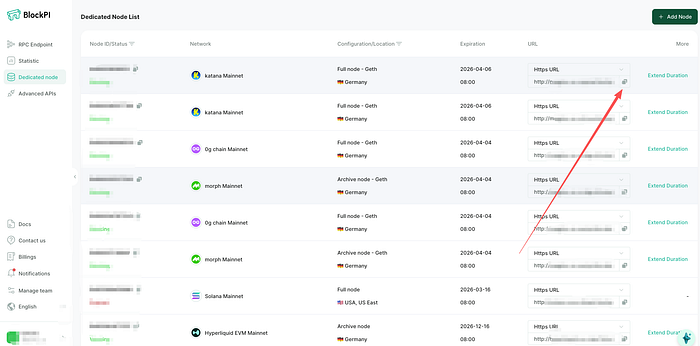
This endpoint becomes the entry point for all subsequent calls.
Instead of building a separate connection model for a different service, developers continue using BlockPI’s endpoint infrastructure while accessing the methods exposed by The Neighborhood.
At a high level, the call path looks like this:
Application → BlockPI Dedicated Node Endpoint → The Neighborhood Method → Processed Result
This is important because it simplifies adoption. Teams do not need to redesign their access model from scratch. They extend their existing infrastructure workflow through a dedicated-node-based advanced feature.
Step 3: Call The Neighborhood Methods Through the BlockPI Endpoint
Once the endpoint is ready, developers can begin calling The Neighborhood methods according to the official documentation.
The exact method names and parameter structures should follow The Neighborhood docs, but the request pattern is typically aligned with a standard API or JSON-RPC style call through the BlockPI endpoint.
Below are example request patterns to illustrate how this works.
Example 1: Create a Transformation
The first step is to create a transformation. A transformation defines how raw on-chain block data should be parsed and converted into structured outputs.
In the example below, the transformation scans BSC block data, iterates through transactions and logs, decodes selected Aave-related events, and outputs a normalized event list with metadata such as chain, block number, timestamp, transaction hash, and log index.
              curl --location '/transformations/simple_test_bsc_transfer_example' \
--header 'Content-Type: application/json' \
--header 'X-API-KEY: 0x0000000000' \
--data '{
    "code": "function AaveEvents(block) { const events = []; const startTime = new Date().getTime(); for (const tx of block.transactions || []) { for (const log of tx.receipt?.logs || []) { const decodedWithMetadata = utils.evmDecodeLogWithMetadata(log, [\"event Supply(address indexed reserve, address user, address indexed onBehalfOf, uint256 amount, uint16 indexed referralCode)\", \"event Withdraw(address indexed reserve, address indexed user, address indexed to, uint256 amount)\", \"event Borrow(address indexed reserve, address user, address indexed onBehalfOf, uint256 amount, uint8 interestRateMode, uint256 borrowRate, uint16 indexed referralCode)\", \"event Repay(address indexed reserve, address indexed user, address indexed repayer, uint256 amount, bool useATokens)\", \"event FlashLoan(address indexed target, address initiator, address indexed asset, uint256 amount, uint8 interestRateMode, uint256 premium, uint16 indexed referralCode)\", \"event UserEModeSet(address indexed user, uint8 categoryId)\", \"event LiquidationCall(address indexed collateralAsset, address indexed debtAsset, address indexed user, uint256 debtToCover, uint256 liquidatedCollateralAmount, address liquidator, bool receiveAToken)\", \"event ReserveDataUpdated(address indexed reserve, uint256 liquidityRate, uint256 stableBorrowRate, uint256 variableBorrowRate, uint256 liquidityIndex, uint256 variableBorrowIndex)\", \"event Transfer(address indexed from, address indexed to, uint256 value)\" ]); if (decodedWithMetadata) { events.push({ chain: block._network, block_number: block.number, block_timestamp: block.timestamp, transaction_hash: tx.hash, log_index: log.logIndex, start_time: startTime }); } } } return events; }",
    "network": "bsc",
    "beat": 85509296
}'
This request creates a transformation named simple_test_bsc_transfer_example. Once created, it can be reused as a processing component inside downstream filters and pipelines.
In practical terms, the transformation layer is where developers define how blockchain data should be interpreted before it is sent anywhere else.
Example 2: Create a Filter
After creating a transformation, the next step is to define a filter. A filter determines which on-chain data should be selected before it moves into the next stage of processing.
In the example below, the request creates a filter named simple_test_bsc_filter_example and provides a list of values to match against. This allows developers to narrow the processing scope and avoid sending unnecessary raw data into downstream workflows.
              curl --location '/filters/simple_test_bsc_filter_example' \
--header 'Content-Type: application/json' \
--header 'X-API-KEY: ' \
--data '{
    "values": [
        "0xd6f4364f..."
    ]
}'
In this example, the filter is configured with a predefined value set. In production, developers should replace the placeholder with the actual hash or values required by their use case.
This step is important because it reduces noise early in the pipeline. Instead of processing all available blockchain data, developers can define exactly which subset should be captured and passed forward.
Example 3: Create a Pipeline
Once both the transformation and filter are ready, they can be connected into a pipeline. A pipeline links together the data source, filtering rules, transformation logic, and delivery target.
This is the stage where The Neighborhood moves beyond raw node querying and becomes a programmable data workflow running through the BlockPI dedicated endpoint.
A simplified pipeline creation example could look like this:
              curl --location '/pipelines/' \
--header 'Content-Type: application/json' \
--header 'X-API-KEY: ' \
--data '{
    “name”:simple_test_bsc_pipeline_example,
    "network": "bsc",
    "filter": "simple_test_bsc_filter_example",
    "transformation": "simple_test_bsc_transfer_example",
    "delivery": {
        "type": "webhook",
        "endpoint": "https://example.com/webhook/aave-events"
    }
}'
This pipeline references:
- the existing filter simple_test_bsc_filter_example,
- the transformation simple_test_bsc_transfer_example,
- and a delivery target where processed results will be sent.
With this setup, developers do not need to manually poll raw node data, decode logs, transform payloads, and build their own delivery system separately. The full workflow is configured directly through The Neighborhood on top of the BlockPI dedicated node.
Recommended Integration Pattern
For teams integrating The Neighborhood on BlockPI, a practical implementation pattern is:
- provision a dedicated node in the required region
- enable The Neighborhood at purchase time
- store the BlockPI endpoint securely in backend configuration
- read the official The Neighborhood method reference
- map application needs to supported method parameters
- test requests with a simple cURL or Postman flow
- integrate the requests into backend services or pipelines
In most cases, the easiest way to start is with a single endpoint and one narrowly scoped request, then gradually expand into more complex filtering or delivery logic.
Notes for Developers
When integrating, teams should keep the following in mind:
- the endpoint comes from BlockPI
- the methods and parameter definitions come from The Neighborhood documentation
- request examples should be aligned with the actual supported method schema
- production integration should validate authentication, rate expectations, response format, and delivery reliability according to the official docs
This makes the integration path straightforward: BlockPI provides the infrastructure entry point, and The Neighborhood provides the programmable data-access capability.
P.S. Follow
Official X: https://x.com/RealBlockPI
Official Youtube channel: https://www.youtube.com/@BlockPINetwork
Official telegram: @blockpidaily
Dashboard: https://dashboard.blockpi.io/

'%3e%3cg%20id='m0w2nq5q87954184'%20opacity='1'%20style='mix-blend-mode:normal'%3e%3cg%3e%3cg%3e%3cg%20id='m0w2nq7j36105061_translate'%3e%3cg%20transform='matrix(1,0,0,1,0,0)'%3e%3cg%20id='m0w2nq7j36105061'%20opacity='1'%20style='mix-blend-mode:normal'%3e%3cg%3e%3cg%3e%3cg%20id='m0w2nq7j47959263_translate'%3e%3cg%20transform='matrix(1,0,0,1,0,0)'%3e%3cg%20id='m0w2nq7j47959263'%20opacity='1'%20style='mix-blend-mode:normal'%3e%3cg%3e%3cg%3e%3cpath%20id='m0w2nq7j47959263_fill_path'%20d='M14,7c0,3.8661%20-3.1339,7%20-7,7c-3.8661,0%20-7,-3.1339%20-7,-7c0,-3.8661%203.1339,-7%207,-7c3.8661,0%207,3.1339%207,7z'%20fill-rule='nonzero'%20fill='rgb(33,%20226,%20110)'%20fill-opacity='0.1'%20style='mix-blend-mode:normal'%3e%3c/path%3e%3cdefs%3e%3cclipPath%20id='m0w2nq7j47959263_stroke_clip_path'%20clipPathUnits='userSpaceOnUse'%3e%3cpath%20d='M14,7c0,3.8661%20-3.1339,7%20-7,7c-3.8661,0%20-7,-3.1339%20-7,-7c0,-3.8661%203.1339,-7%207,-7c3.8661,0%207,3.1339%207,7z'%3e%3c/path%3e%3c/clipPath%3e%3c/defs%3e%3cg%20style='mix-blend-mode:normal'%3e%3cg%20clip-path='url(%23m0w2nq7j47959263_stroke_clip_path)'%3e%3cpath%20id='m0w2nq7j47959263_stroke_path'%20d='M14,7c0,3.8661%20-3.1339,7%20-7,7c-3.8661,0%20-7,-3.1339%20-7,-7c0,-3.8661%203.1339,-7%207,-7c3.8661,0%207,3.1339%207,7z'%20fill='none'%20stroke='rgb(33,%20226,%20110)'%20stroke-width='2'%20stroke-linecap='butt'%20stroke-linejoin='miter'%20stroke-dasharray='0%200'%20stroke-opacity='0.1'%3e%3c/path%3e%3c/g%3e%3c/g%3e%3c/g%3e%3c/g%3e%3c/g%3e%3c/g%3e%3c/g%3e%3cg%20id='m0w2nq7l54971424_translate'%3e%3cg%20transform='matrix(1,0,0,1,4.5,4.5)'%3e%3cg%20id='m0w2nq7l54971424'%20opacity='1'%20style='mix-blend-mode:normal'%3e%3cg%3e%3cg%3e%3cpath%20id='m0w2nq7l54971424_fill_path'%20d='M5,2.5c0,1.3808%20-1.1192,2.5%20-2.5,2.5c-1.3807,0%20-2.5,-1.1192%20-2.5,-2.5c0,-1.3807%201.1193,-2.5%202.5,-2.5c1.3808,0%202.5,1.1193%202.5,2.5z'%20fill-rule='nonzero'%20fill='rgb(33,%20226,%20110)'%20fill-opacity='1'%20style='mix-blend-mode:normal'%3e%3c/path%3e%3c/g%3e%3c/g%3e%3c/g%3e%3c/g%3e%3c/g%3e%3cg%20id='m0w2rq8l61408986_translate'%3e%3cg%20transform='matrix(1,0,0,1,4.5,4.5)'%3e%3cg%20id='m0w2rq8l61408986'%20opacity='1'%20style='mix-blend-mode:normal'%3e%3cg%3e%3cg%3e%3cpath%20id='m0w2rq8l61408986_fill_path'%20d='M5,2.5c0,1.3808%20-1.1192,2.5%20-2.5,2.5c-1.3807,0%20-2.5,-1.1192%20-2.5,-2.5c0,-1.3807%201.1193,-2.5%202.5,-2.5c1.3808,0%202.5,1.1193%202.5,2.5z'%20fill-rule='nonzero'%20fill='rgb(33,%20226,%20110)'%20fill-opacity='1'%20style='mix-blend-mode:normal'%3e%3c/path%3e%3c/g%3e%3c/g%3e%3c/g%3e%3c/g%3e%3c/g%3e%3c/g%3e%3c/g%3e%3c/g%3e%3c/g%3e%3c/g%3e%3c/g%3e%3c/g%3e%3c/g%3e%3c/g%3e%3c/g%3e%3canimateTransform%20href='%23m0w2nq7l54971424'%20attributeName='transform'%20type='translate'%20values='2.5%202.5;2.5%202.5;2.5%202.5;2.5%202.5'%20dur='5s'%20repeatCount='indefinite'%20calcMode='spline'%20keyTimes='0;0.18;0.36;1'%20keySplines='0.91%200%200.15%201;0.91%200%200.15%201;0.5%200.35%200.15%201'%20additive='sum'%20fill='freeze'%3e%3c/animateTransform%3e%3canimateTransform%20href='%23m0w2nq7l54971424'%20attributeName='transform'%20type='scale'%20values='1%201;3%203;1%201;1%201'%20dur='5s'%20repeatCount='indefinite'%20calcMode='spline'%20keyTimes='0;0.18;0.36;1'%20keySplines='0.91%200%200.15%201;0.91%200%200.15%201;0.5%200.35%200.15%201'%20additive='sum'%20fill='freeze'%3e%3c/animateTransform%3e%3canimateTransform%20href='%23m0w2nq7l54971424'%20attributeName='transform'%20type='translate'%20values='-2.5%20-2.5;-2.5%20-2.5;-2.5%20-2.5;-2.5%20-2.5'%20dur='5s'%20repeatCount='indefinite'%20calcMode='spline'%20keyTimes='0;0.18;0.36;1'%20keySplines='0.91%200%200.15%201;0.91%200%200.15%201;0.5%200.35%200.15%201'%20additive='sum'%20fill='freeze'%3e%3c/animateTransform%3e%3canimate%20href='%23m0w2nq7l54971424'%20attributeName='opacity'%20values='1;0;1;1'%20dur='5s'%20repeatCount='indefinite'%20calcMode='spline'%20keyTimes='0;0.18;0.36;1'%20keySplines='0.91%200%200.15%201;0.91%200%200.15%201;0.5%200.35%200.15%201'%20additive='replace'%20fill='freeze'%3e%3c/animate%3e%3c/svg%3e) Status©2026 BlockPI
Status©2026 BlockPI